Home › Bathroom › Renter-Friendly Bathroom Storage
Renter-Friendly Bathroom Storage: 14 Upgrades, Zero Holes
The best renter friendly bathroom storage ideas use tension, freestanding frames, over-door hooks and removable adhesive, never a drill. Work zone by zone, shower, sink, over the toilet, door and walls, keep heavy items low, respect adhesive weight limits in steam, and every upgrade here leaves with you.
In a hurry? Start with the first pick in the table below — it is the one most renters should look at first. Check Price on Amazon
Let me guess your bathroom. The counter holds more bottles than the cabinet, the towels live wherever they land, and the one shelf you were promised by the listing photos turned out to be the top of the cistern. I have organised a lot of rental bathrooms, in my head and on paper and for friends who swore theirs was uniquely impossible, and I can tell you the problem is almost never the size of the room. It is that the room was designed for a person who owned one towel and a bar of soap. This guide fixes that with fourteen upgrades and zero holes, and it lives in our Bathroom hub alongside the rest of our no-drill storage thinking.
Here is how to use this page kindly and well. Do not buy all fourteen. Nobody's bathroom needs all fourteen, and a room stuffed with storage is just clutter with compartments. Instead, find your worst zone in the quick table below, fix that zone first, and live with the improvement for a week. Then fix the next zone if it still bothers you. Each upgrade comes with its method, what it is best for, its honest catch, and how it comes away at the end of your tenancy, because a renter upgrade that cannot leave cleanly is not a renter upgrade at all. If your project grows beyond storage into a full refresh, our looks at peel-and-stick floor tiles and renter-friendly wallpaper follow the same leave-no-trace rules.
If your shower is the emergency, as it is in most homes I hear about, start here.
The 14 upgrades at a glance
Skim the catch column before you fall for any single idea. Every method in a bathroom trades something, usually patience, capacity, or a little visual calm, and the right upgrade is the one whose trade you mind least.
| Pick | Zone | Method | The catch |
|---|---|---|---|
| Tension pole corner caddy | Shower | Tension between floor or tub edge and ceiling | The catch is wobble at the extremes. |
| Adhesive corner shower shelves | Shower | Waterproof adhesive pads on clean smooth tile or glass | The catch is honesty about steam and time. |
| Hanging caddy over the showerhead or shower door | Shower | Hooks over the showerhead pipe or over the glass shower door | The catch is movement and reach. |
| Two-tier sliding under-sink organizer | Sink and vanity | Freestanding frame that fits around plumbing, with sliding trays | The catch is that it organises a cabinet, it does not enlarge one. |
| Countertop tray corral for daily essentials | Sink and vanity | A single tray that sets a visible limit on what may live on the counter | The catch is discipline, not money. |
| Adhesive shelves beside the mirror | Sink and vanity | Removable adhesive pads on smooth wall or tile beside the mirror | The catch is placement permanence of a soft kind. |
| Drawer dividers and small in-drawer trays | Sink and vanity | Drop-in dividers and modular trays, no fixing of any kind | The catch is that dividers reveal how much you own. |
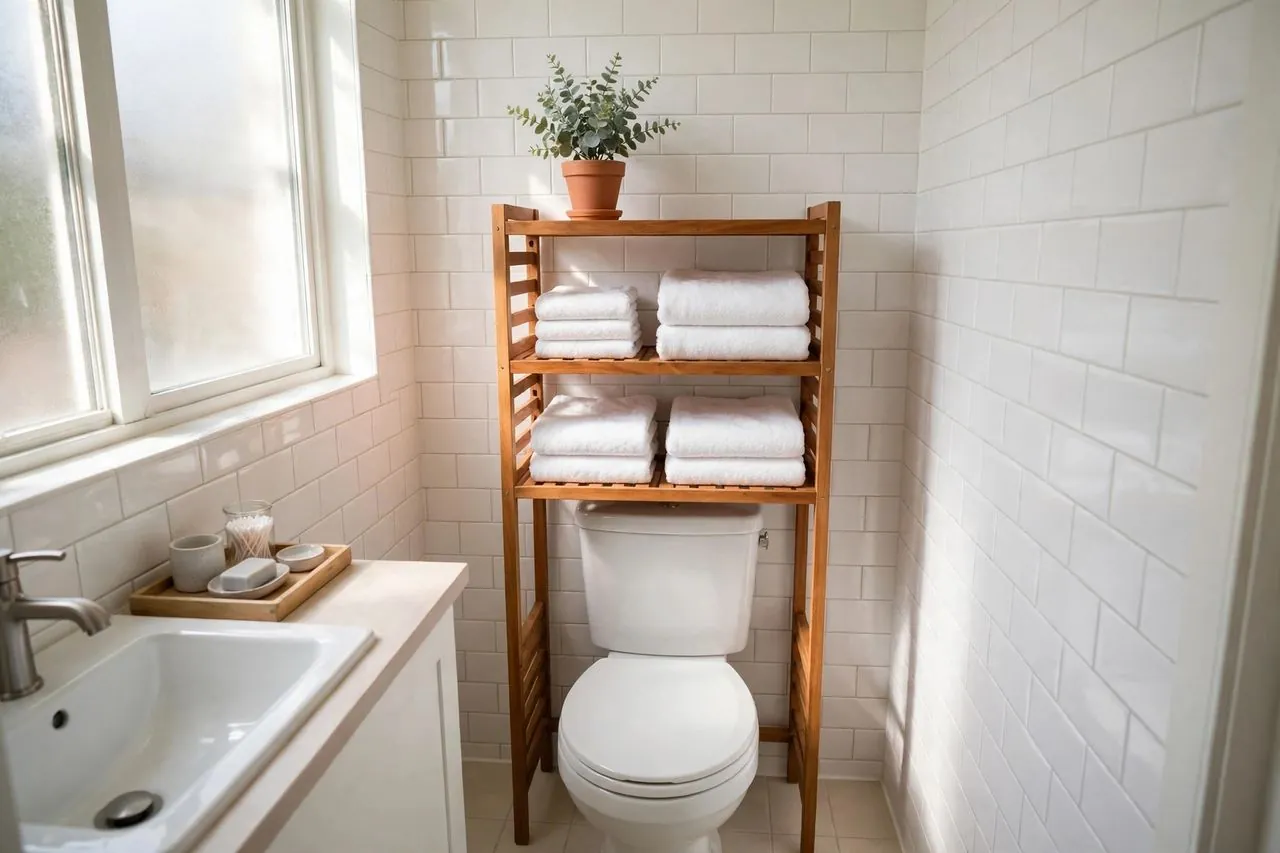
| Freestanding over-toilet shelving unit | Over the toilet | A frame that straddles the tank, standing on the floor | The catch is presence. |
| Tank tray with a small basket for spares | Over the toilet | A narrow tray resting on the cistern, no fixing | The catch is scale and temptation. |
| Over-door clear pocket organizer | Door | Hooks over the top of the door, pockets hanging down the back | The catch is weight and swing. |
| Over-door hook rack for towels and robes | Door | A rack hooked over the door top with a row of hooks | The catch is that towels on a door dry slower than towels on a ventilated bar if the door stays closed against a steamy room. |
| Slim rolling cart for the gap beside the toilet | Walls and gaps | A narrow wheeled cart that slides into unused floor gaps | The catch is wobble on uneven floors and the temptation to use it as a moving junk shelf. |
| Leaning ladder shelf for towels and baskets | Walls and gaps | A ladder frame leaning against the wall, held by its own weight | The catch is stability and footprint together. |
| Removable adhesive hooks plus a magnetic strip inside the cabinet door | Walls and gaps | Adhesive hooks on tile or smooth door faces, and a self-adhesive magnetic strip inside a cabinet door | The catch is that small upgrades invite careless placement. |
This guide is for you if
You rent, your lease says no holes or your conscience does, and your bathroom storage currently consists of a cabinet, a windowsill, and hope. It is also for you if you are in a first apartment building storage from nothing, or sharing one small bathroom between several humans and their many bottles. Everything here can be installed with your hands, a tape measure, and patience, and everything here can move house with you.
Think twice if
Your bathroom has a serious damp or leak problem, because storage placed over active damp hides damage and can make it worse, and that conversation belongs with your landlord first. Also think twice about adhesive if your walls are wallpapered, freshly painted, or already peeling, and about freestanding towers of storage if small children climb in your home. The sections below flag those cases upgrade by upgrade, because a page that only sells you things is not helping you.
The 14 upgrades, grouped by zone
A word on how these are written. I will not pretend a listing photograph tells us how a product survives a year of steam, so instead each upgrade teaches you the method rules and the exact pack details to check, the stated weight, the stated size range, the included pieces, and the removal method. Those checks are what separate a good buy from a soggy disappointment, in this room more than any other in your home.
Zone: Shower
Tension pole corner caddy
Method: Tension between floor or tub edge and ceiling. Best for: Corner showers and tubs with bottles on the rim.
This is the hardest worker in a shower with no built-in shelf. A spring-loaded pole stands in the corner, held by pressure at both ends, and carries a stack of baskets down its length. Nothing sticks, nothing screws, and the whole thing can come down in under a minute on moving day. Put it in the corner farthest from the showerhead, where the baskets sit damp rather than drenched, and load it by person or by job, with daily bottles low where hands reach easily and refills up high.
The method rules are simple and they are the whole game. Measure your floor-to-ceiling or tub-to-ceiling height before you order and check it against the range the pack states, because a pole that is too short will never grip and a pole that is too long will not fit at all. Twist or extend it until it will not budge when you push it firmly with one hand, then check it again a day later, because poles can settle a fraction as the room warms and cools. Keep heavy family-size bottles on the lowest basket, closest to the support, and give glass bottles a home somewhere else entirely.
The catch: The catch is wobble at the extremes. Very tall ceilings, sloped ceilings, and curved tub edges can all defeat a tension fit, and an overloaded top basket makes any pole feel nervous. If your ceiling is unusually high, read the stated height range twice before buying.
Removal: Removal is a reverse twist. Empty it, ease the tension off slowly while holding the pole so it does not spring or topple, and wipe the two small contact marks where the feet sat. Nothing remains on the wall or the ceiling.
Adhesive corner shower shelves
Method: Waterproof adhesive pads on clean smooth tile or glass. Best for: Tiled showers with no ledge and nowhere for shampoo.
Adhesive corner shelves are the closest thing a renter gets to a built-in shower niche. Two triangular shelves in a corner hold your daily bottles at hand height, off the tub rim and out of the puddles. They are also the upgrade on this page that rewards patience most, so let me give you the method exactly as it deserves to be followed.
Clean the tile with rubbing alcohol and let it dry fully, because soap film is the invisible reason most adhesive fails. Position the shelf, mark it lightly, apply the pads as the pack directs, press firmly, and then walk away for the full curing time the pack states, which is commonly a full day, before a single bottle goes on. Load light at first. Check what the pack says about weight and stay well under it, and keep the heaviest bottles on the lower shelf. Smooth glazed tile and glass are the friendly surfaces here. Textured tile, rough stone, painted walls, and grout lines under the pad are not, and no amount of pressing fixes an unsuitable surface. Our dedicated guide to the best adhesive shower shelves goes deeper on surface matching if this is your main project.
The catch: The catch is honesty about steam and time. Even good bathroom adhesive softens slowly in a hot, wet room, so treat these shelves as strong but not immortal, recheck them now and then, and never trust them with a heavy glass bottle above bare feet.
Removal: Removal means warming the pad gently if the maker suggests it, peeling slowly rather than ripping, and rolling away any residue with your thumb or a maker-approved method. Done slowly, pads come off tile cleanly. Done in a hurry, they can take paint with them, which is why these belong on tile or glass, not painted drywall.
Hanging caddy over the showerhead or shower door
Method: Hooks over the showerhead pipe or over the glass shower door. Best for: Showers where walls and corners are already spoken for.
The oldest renter trick in the bathroom still works. A wire caddy hangs from the showerhead pipe, or hooks over the top of a glass shower door, and gives two or three bottles and a bar of soap a home for almost no effort. There is nothing to cure, nothing to measure beyond bottle height, and it can be up before your shower warms and down again just as fast.
Two small rules keep it pleasant. First, choose a caddy with a way to stop it swinging or sliding down the pipe, because a caddy that migrates and clatters every time you reach for it will annoy you daily. Some designs include a suction cup or a locking collar for exactly this, so check the pack description for how it stabilises itself. Second, keep it light and keep it to daily items. A hanging caddy is a perch, not a pantry, and the showerhead pipe was plumbed to carry water, not your entire product collection plus a stone scrubber. If your household is a many-bottle household, pair this with the tension caddy above rather than asking one hook to do everything, and see our roundup of the best no-drill shower caddies for the full comparison.
The catch: The catch is movement and reach. It swings a little, it sits high for shorter people, and in a shared shower it becomes contested territory very quickly. It is a brilliant first fix and a modest final answer.
Removal: Removal is simply lifting it off. Wipe the pipe or the glass where the hooks rested, check for any water marks, and the shower is exactly as you found it. This is the zero-risk way to test whether shower storage changes your mornings before you commit to anything stickier.
Zone: Sink and vanity
Two-tier sliding under-sink organizer
Method: Freestanding frame that fits around plumbing, with sliding trays. Best for: Cabinets ruled by pipes, where everything vanishes to the back.
Every rental bathroom has this cabinet. You open it, you see pipes, a tangle of bottles, and the cleaner you bought twice because the first one was hiding at the back. A two-tier organizer shaped to work around plumbing turns that cave into two visible levels, and sliding trays mean the back row comes to you instead of you kneeling on the bath mat reaching for it.
Measure before you buy, and measure the awkward things. Note the height and width of the cabinet opening, the depth front to back, and exactly where the pipes run and how low they hang, because the pipe position decides whether a two-tier frame fits at all and which side it should sit on. Check the pack dimensions against your numbers, not against a photograph of somebody else's cabinet. Once it is in, group by category, with cleaning things in one tray, backups in another, and daily items at the front. A tray you can pull out and carry to the job beats a cupboard you have to excavate, every single time.
The catch: The catch is that it organises a cabinet, it does not enlarge one. If the cabinet is damp from a slow drip, fix or report the drip first, because no organizer survives living in a puddle and your landlord would rather hear about a small leak now than water damage later.
Removal: Removal is lifting it out and wiping the cabinet base. Nothing was attached, so nothing needs undoing. Pack the trays flat or nest them with towels inside for the move.
Countertop tray corral for daily essentials
Method: A single tray that sets a visible limit on what may live on the counter. Best for: Counters that grow bottles while you sleep.
This is the cheapest upgrade here and possibly the most effective. Put one tray on the counter and make one kind rule with yourself. Only what fits on the tray lives on the counter. Everything else earns a home in a cabinet, a caddy, or a cart. The tray turns a spreading collection into a deliberate display, and a counter that looked chaotic at twenty items looks intentional at six, even when they are the same six items.
Choose a tray that tolerates water, because it will live beside a sink and get splashed daily. Raised edges keep bottles from migrating, and a size matched to your true daily routine keeps you honest. Too big and the tray becomes a counter on the counter. Too small and you will cheat by stacking things beside it, which is the old problem wearing a new hat. Put the tray where your hand already goes in the morning, group the items in the order you use them, and do a ten-second reset while the kettle boils or the shower warms. Small storage that asks for ten seconds a day will still be working in a year. Grand systems that ask for ten minutes will not.
The catch: The catch is discipline, not money. The tray only works if the rule holds when a new product arrives, and the rule is one in, one out, or one in and something moves to a backup spot. Households sharing one counter need to agree the rule together or the tray becomes one person's island in a shared sea.
Removal: Removal is a lift and a wipe. If you use a tray with felt or rubber feet, check underneath now and then for trapped moisture, and let the counter dry fully on cleaning day.
Adhesive shelves beside the mirror
Method: Removable adhesive pads on smooth wall or tile beside the mirror. Best for: Daily skincare and dental things with no medicine cabinet.
If you have no medicine cabinet, the wall beside your mirror is your medicine cabinet waiting to happen. One or two small adhesive shelves at a comfortable height hold the toothbrush holder, the daily skincare, and the contact lens pot, right where you stand, at the height your hands expect them. It is the upgrade that makes a rented bathroom feel most like it was designed for you.
Use the adhesive method properly and these shelves will serve you well. Choose smooth painted wall away from direct shower spray, or smooth tile, and avoid wallpaper, textured finishes, and any surface that is already peeling. Clean, dry, press, and cure for the full time the pack states before loading. Check the stated weight figure and stay well under it, because a shelf beside a mirror holds small light things beautifully and was never meant for a row of heavy glass bottles. Keep a little gallery rail or lipped edge in mind when you choose, too, because items beside a mirror get reached for with wet hands and sleepy eyes, and a lip forgives a fumble. For more wall options that stop at the same no-drill line, browse our best no-drill shelves roundup.
The catch: The catch is placement permanence of a soft kind. Adhesive can be removed, but you will not want to move these weekly, so live with the spot in your imagination for a day before sticking. Measure with your elbows too, because a shelf that clips you during your routine will be resented at exactly face height.
Removal: Removal follows the maker's release method exactly, usually a slow downward pull on a tab or a gentle peel after warming, never a straight rip off the wall. Take your time, keep a hand on the shelf so it does not drop into the sink, and any faint mark usually wipes away.
Drawer dividers and small in-drawer trays
Method: Drop-in dividers and modular trays, no fixing of any kind. Best for: One chaotic vanity drawer that swallows everything small.
If your bathroom has even one drawer, dividers are the highest return on the smallest effort on this whole page. Without them a drawer is a soup of hair ties, cotton buds, nail tools, and a lip balm from another era. With them, every category gets a compartment, you can see a missing item at a glance, and putting things back becomes the easiest option instead of a decision you make forty times a day.
Measure the drawer inside, width, depth, and height, because bathroom drawers are often shallower than kitchen drawers and a divider set that is too tall will stop the drawer closing, which you will discover at the worst possible moment. Adjustable dividers forgive odd sizes, while modular trays let you build a layout around your own categories. Give medications a compartment of their own, keep sharp tools in one tray where fingers learn to expect them, and leave one small compartment deliberately empty. That empty space is not waste. It is where the next small thing lands without breaking the system, and systems with a pressure valve are the ones that survive real life.
The catch: The catch is that dividers reveal how much you own. The first sort will produce a small pile of things that fit no category because you never use them, and the honest move is to let that pile go rather than buying a bigger drawer system to house it.
Removal: Removal is lifting everything out. There is nothing to unstick or unscrew, and the drawer is untouched. Dividers travel beautifully, nested inside each other in the same box as your towels.
Zone: Over the toilet
Freestanding over-toilet shelving unit
Method: A frame that straddles the tank, standing on the floor. Best for: Bathrooms with no linen closet and a blank wall above the toilet.
The wall above a toilet is the largest unused storage surface in most rental bathrooms, and a freestanding unit is how a renter claims it without touching the wall. The frame stands on the floor, its legs either side of the cistern, and gives you two or three shelves where towels, spare toilet paper, and backup bottles can live in the open, visible and reachable.
Measuring decides success here, so be thorough. Measure the widest point of your cistern, the height from the floor to the top of the cistern, and the space from the wall to where a shelf would need to clear an open toilet lid, because a lid that cannot open fully will remind you of your mistake every day. Check the pack for the gap between the lowest shelf and the floor and compare it with your cistern height, and check the leg width against your widest measurement with a little room to spare on each side. Load heavy things low, keep the top shelf for light items like rolled towels, and keep glass off the high shelves altogether, because a freestanding frame can be bumped and what falls into a toilet bowl or onto a hard floor from height is gone. Shim a wobbly leg rather than ignoring the wobble, since a rocking unit trains everyone to distrust it.
The catch: The catch is presence. An over-toilet unit fills the room visually in a way a wall shelf does not, and in the very smallest bathrooms it can feel like furniture looming. Measure your sight lines as well as your cistern, and choose an open, light-coloured frame if the room is tiny.
Removal: Removal is unbuilding or simply carrying it out, depending on the design. Wipe the floor where the legs stood. Nothing touches the wall, so your deposit conversation never includes this upgrade at all.
Tank tray with a small basket for spares
Method: A narrow tray resting on the cistern, no fixing. Best for: Homes that need one spare roll and a home for small extras.
Not every bathroom needs a shelving unit. Sometimes the whole problem is one spare roll living on the floor and a few small things with nowhere polite to sit. A narrow tray across the top of the cistern, holding a small basket of spares, solves exactly that problem for very little money and zero installation, and it makes the top of the cistern look chosen rather than used as a shelf of last resort.
Keep it light, keep it low, and keep it boring. A tray should hold things that cannot hurt anyone if they slide, so spare rolls, a small plant, folded hand towels, and wrapped spares are perfect, while glass bottles, candles near curtains, and anything heavy or breakable are not. Check that the tray sits flat and stable on your cistern shape, because some cistern tops are curved or stepped and a tray that rocks will shed its contents slowly and then suddenly. A basket with a liner keeps small items from escaping through the sides and makes the whole thing lift off in one hand on cleaning day, which is more often than you think, because the top of a cistern gathers dust like it is paid to.
The catch: The catch is scale and temptation. This is garnish, not storage, and the moment you ask it to hold daily bottles it will fail you. Let it do its small job perfectly and get your real storage from the other upgrades around it.
Removal: Removal is one lift and a wipe of the cistern top. There is nothing else to say, which is exactly the point of choosing it.
Zone: Door
Over-door clear pocket organizer
Method: Hooks over the top of the door, pockets hanging down the back. Best for: Backups, hair tools, and cleaning supplies with no cupboard to hide in.
The back of your bathroom door is a full extra wall that most renters never use. A clear pocket organizer turns it into visible, labelled-by-sight storage for backup toiletries, hair tools, first aid bits, and cleaning supplies. Clear pockets are the detail that matters, because you can see a nearly empty shampoo before your shower, not during it, and guests can find a spare roll without opening every cupboard you own.
Test the door before you fall in love. Open and close it slowly with the hooks in place and watch the top corner, because some doors fit their frames too tightly for over-door hooks, and a door that sticks or scrapes is a door your landlord will notice. If the gap is too thin, hang the organizer from removable adhesive hooks on the door face instead, following the hook maker's weight guidance. Fill heavy items into the lowest pockets so the organizer hangs calmly instead of swinging, and put small felt pads on the back corners if it taps against the door when people walk past. Then give every pocket one job, because a pocket organizer with mixed pockets becomes a vertical junk drawer with better lighting. Browse our wider test of the best over-the-door organizers if you want this format in other rooms too.
The catch: The catch is weight and swing. These organisers will carry far less than they appear to promise in a styled photograph, and a door that gets slammed by teenagers or toddlers will test every pocket seam you own. Load it like a librarian, not like a warehouse.
Removal: Removal is lifting the hooks off the door. Check the top edge of the door for any rub marks, touch nothing else, and the door is as it was. If you used adhesive hooks instead, follow their release method slowly.
Over-door hook rack for towels and robes
Method: A rack hooked over the door top with a row of hooks. Best for: Homes with one towel bar and four people, or a robe with no home.
One towel bar is the standard fitting in a rental bathroom and it is never enough. An over-door hook rack adds a row of hooks at useful height for bath towels, robes, and the wash bag of a guest, without a single hole in a tiled wall that you would have to explain later. Towels dry better spread or looped with air around them than balled on a single bar, so this upgrade quietly improves the damp-towel smell problem as well as the storage problem.
Check the same door gap as the pocket organizer, and close the door gently the first few times to learn how the rack behaves. Space the towels so they do not overlap in a damp sandwich, because hooks placed too close together recreate the problem in a new formation. Keep the rack for textiles and very light items only. It is not a place for heavy toiletry bags full of bottles, which tug the rack forward, mark the door, and swing against it with every use. If your bathroom door is hollow and light, be especially gentle with loading, and consider whether a leaning ladder elsewhere in the room would carry your towel load with less drama.
The catch: The catch is that towels on a door dry slower than towels on a ventilated bar if the door stays closed against a steamy room. Crack the door or run the fan after showers, a theme this page will return to, because moving damp air matters as much as adding hooks.
Removal: Removal is a lift off the top of the door. Wipe any faint contact marks, check the door edge, and nothing remains. Keep the rack for your next home, because every rental bathroom you ever live in will have exactly one towel bar.
Zone: Walls and gaps
Slim rolling cart for the gap beside the toilet
Method: A narrow wheeled cart that slides into unused floor gaps. Best for: The five-to-seven-inch gap that currently holds only dust.
Look at the gap between your toilet and the wall, or between the vanity and the tub. In most bathrooms it is a narrow, useless canyon that collects dust and dropped hair ties. A slim rolling cart sized to that gap turns it into three tiers of storage that pull out when you need them and vanish when you do not, and the wheels make cleaning behind the toilet possible without moving furniture, which alone justifies it in my book.
Measure the gap at its narrowest point, remembering that skirting boards steal width at floor level where the cart actually travels. Check the pack width against that true number, not the generous measurement at waist height. Load it in tiers with a logic you can keep. Daily items on top where your hand falls, rolled hand towels in the middle because rolled beats folded in narrow tiers, and spare toilet paper at the bottom where its weight steadies the cart. Keep bottles upright and lids closed, because a cart that rolls daily will find any lid you left loose. If the gap beside your toilet is too narrow, the same cart often fits beside a vanity or at the end of a tub, so measure your whole room before you give up on the format.
The catch: The catch is wobble on uneven floors and the temptation to use it as a moving junk shelf. A tall, narrow, fully loaded cart on a sloped old floor needs a gentle hand, and a cart with no tier logic becomes a trolley of mysteries within a month.
Removal: Removal is rolling it out and taking it with you. Wipe the gap it leaves behind, which will need it, and that is the complete process. No marks, no fixings, no evidence.
Leaning ladder shelf for towels and baskets
Method: A ladder frame leaning against the wall, held by its own weight. Best for: Blank walls where a shelf would help but drilling is not an option.
A leaning ladder is the renter's bookshelf for the bathroom. It rests against the wall, holds folded towels, baskets, and a plant across its rungs or shelves, and adds the kind of vertical storage that makes a plain bathroom look deliberately styled. Because it only leans, it can move rooms in a minute, follow you to a bedroom in the next home, and never once meet a drill.
Place it away from direct shower spray so towels stored on it stay dry, and on the most level stretch of floor you have, with any anti-slip pads the maker provides fitted at the feet and the top contact points. Load it bottom-heavy, with baskets and folded stacks low and only light decorative things high, and never let children treat it as the ladder its shape suggests, because it is furniture that leans, not equipment that climbs. Check its depth against your room honestly. A ladder leans out at the base, so it takes more floor than a flat shelf, and in a very small bathroom that footprint may cost more comfort than the storage returns. Measure the floor line it will occupy and walk past that space in your mind at night, half asleep, before you commit.
The catch: The catch is stability and footprint together. It is the least fixed item here, so it belongs in a calm corner, not beside a busy door, and households with large dogs or climbing toddlers should choose the over-toilet unit instead and sleep better.
Removal: Removal is picking it up and walking out with it. Wipe the two contact points on the wall where the top rested, and check for any faint rub mark, which a damp cloth usually lifts straight away.
Removable adhesive hooks plus a magnetic strip inside the cabinet door
Method: Adhesive hooks on tile or smooth door faces, and a self-adhesive magnetic strip inside a cabinet door. Best for: The small metal chaos of tweezers, clippers, and hair tools, plus towels with nowhere to hang.
The final upgrade is two small ideas that share one principle, which is to use the hidden faces of the room. Removable adhesive hooks on a tiled wall or the back of a door give loofahs, robes, and small hanging baskets a home. Inside the cabinet door, a self-adhesive magnetic strip corrals the little metal tools, tweezers, nail clippers, scissors, and hair grips, that otherwise vanish into drawer corners and reappear underfoot.
For hooks, surface and patience decide everything. Smooth tile, glass, and sound painted doors are the friendly faces. Wallpaper, flaking paint, and textured walls are not, and a hook that fails drops whatever it held into the sink or the floor, so hang unbreakable things first while a new hook earns your trust. Follow the pack's cleaning, pressing, and curing steps exactly, respect the stated weight with room to spare, and remember that heat and steam test adhesive daily in this room. For the magnetic strip, clean the inside of the cabinet door, position the strip where tools will not collide with shelves when the door closes, and test the close a few times before loading every tool you own. Small tools only is the rule, because a strip inside a door is a corral for grams, not kilos.
The catch: The catch is that small upgrades invite careless placement. A hook stuck in a hurry in the wrong spot is a hook you will remove and replace, and adhesive forgives that only so many times on the same patch of paint. Plan the layout on paper or with painter's tape first, live with the tape version for a day, and only then commit.
Removal: Removal is where removable adhesive earns its name, provided you use the maker's release method, slowly, exactly as directed, pulling tabs in the direction shown rather than prising hooks straight off. The magnetic strip peels away from the cabinet door in the same slow spirit, and any residue usually rolls off with a thumb and patience.
How to choose: the bathroom-wide rules
Humidity decides your materials
A bathroom is the wettest room in your home, and it punishes the wrong materials quietly and then all at once. Prefer stainless steel, properly coated metal, plastic, resin, and sealed or synthetic finishes for anything that will live here full time. Be honest about bare wood and uncoated metal. They can look beautiful in a photograph and tired within a season in a steamy room with poor ventilation, unless the maker has clearly designed and finished them for bathroom use, so check the pack description for bathroom suitability rather than assuming it. Whatever you choose, your fan is part of your storage system. Run it during showers and for a good while after, because dry air is what keeps adhesive gripping, metal bright, and baskets smelling like baskets.
Rust, told honestly
No metal bathroom product is magically rust-proof forever. Coatings protect until they are chipped, welds and joints are where moisture settles, and a caddy that lives in direct spray works harder than one that lives in a dry corner. So place metal storage out of the direct spray path where you can, wipe it dry when you clean the room, and treat the first small spot of rust as information, clean it, dry the piece, and move it somewhere drier, rather than as a betrayal. If honest longevity matters more to you than a metal look, plastic and resin organisers in the wettest zones will quietly outlast prettier options, and nobody has ever visited a home and judged the shower caddy material.
Weight limits over tile and on adhesive
Two weight rules protect renters in this room. First, adhesive holds best on tile and holds least in steam, so treat every stated figure as a dry-room best case and load well under it, with glass and heavy bottles living elsewhere. Second, anything mounted or stuck above a hard floor or a porcelain fixture must be loaded as if it could one day fall, because the cost of a fall here is a chipped tub or a cut foot, not just a mess. Keep heavy things low and on floor-standing storage, keep stuck-on storage light and over soft landings where possible, and recheck bonds regularly. If you are also planning the kitchen, the same weight honesty runs through our magnetic spice rack guide, and the whole method is gathered in our small apartment hub.
Measure the room the way it is used
Measure with doors opening, lids lifting, and elbows out, not in a frozen empty room. Check that an over-toilet unit clears your cistern and an open lid, that a door organizer still lets the door close, that a cart gap is measured at skirting height, and that a shelf beside the mirror does not meet your head during your routine. Bathrooms are used by sleepy people in a hurry, and storage that only works for a careful person at noon is storage that fails at seven in the morning.
Mistakes and red flags: what not to buy
The clearest red flag in this category is any product that needs screws into tile while calling itself renter friendly in the headline. Drilled tile is permanent, visible, and expensive to make good, and no storage is worth that conversation at inspection. The second is a suction-only shelf sold for heavy bottles. Suction is fine for a light hook holding a flannel and unreliable for a litre of shampoo above bare feet, especially once steam and soap film get involved. The third is adhesive with no removal instructions anywhere on the pack, because a maker who has not thought about removal has not thought about renters, whatever the listing says.
Be wary, too, of metal described in glowing terms with no mention of coating or bathroom use, of over-toilet units sold without clear internal measurements, and of organiser sets photographed in bathrooms three times the size of yours. The common personal mistakes are just as predictable. Sticking adhesive to a wall you did not clean, loading it the same hour instead of after its cure, and placing it in the direct spray zone are the top three, and they account for most of the one-star stories in this whole category. Skipping the tape measure is fourth. Buying for a fantasy bathroom, with a linen closet and a double vanity, instead of the real one with a pedestal sink, is fifth. Every one of those is avoidable with an hour of patience, and patience is the only tool this entire page really requires.
Removal and your deposit, method by method
Freestanding, tension, rolling, leaning, and over-door upgrades need no removal process at all. You lift them, carry them out, and wipe the small contact points where feet, poles, or hooks rested. That is the whole ceremony, and it is why those methods sit at the top of our renter confidence list, which our deposit protection guide sets out in full.
Adhesive is the method that asks for technique, so give it a proper moment rather than the last frantic hour of moving day. Work slowly, follow the maker's release method exactly, support the shelf or hook with one hand so it cannot fall and chip porcelain, and roll residue away gently instead of scraping at it. If something resists, stop, reread, and try again more slowly, because force is the only ingredient that turns removable into repairable. Suction, where you have used it for light items, releases with a lifted edge and leaves nothing. Magnetic strips inside cabinet doors peel away in the same slow spirit as adhesive. Plan your take-down a day or two before you hand back keys, photograph each wall as you clear it, and your future self, standing in an empty calm bathroom with a deposit intact, will be grateful you did. For the rest of the home, our peel-and-stick hub and our guide to renter-friendly kitchen organization apply the same method-by-method care room by room.
Frequently asked questions
- Will any of these bathroom upgrades damage my walls or tiles?
- Done properly, no. Freestanding, tension, over-door, and rolling upgrades touch nothing permanently and leave nothing behind. Adhesive upgrades are the ones that ask for care. Use products labelled removable, apply them to suitable smooth surfaces, give them their full curing time, and remove them slowly using the maker's release method rather than pulling them straight off. Most deposit problems come from rushing removal on the last day, not from the products themselves, so take things down before moving day, not during it.
- What is the best renter friendly bathroom storage if I can only buy one thing?
- Start with the upgrade that solves your loudest daily problem rather than the most impressive one. If bottles live on the tub rim, a shower caddy changes your mornings most. If the counter is buried, an under-sink organizer or a rolling cart will feel miraculous. If towels have no home, an over-door hook rack wins. Bathrooms fail one zone at a time, so fixing your worst zone first gives you the biggest relief for the smallest spend, and you can add a second zone next month.
- How much weight can adhesive bathroom shelves really hold?
- Only the pack for your exact shelf can state its figure, and you should plan to stay well under whatever it says. Those figures are earned in dry, clean test conditions, while your bathroom adds steam, splashes, and daily tugging. Keep adhesive shelves for light daily items, put heavy glass bottles on freestanding or tension storage instead, and recheck the bond every few weeks with a gentle downward press. A shelf that has started to creep or tilt is asking to be taken down, cleaned, and remounted with fresh pads.
- Which surfaces are safe for adhesive shelves and hooks in a bathroom?
- Smooth glazed tile, glass, and sound, fully cured painted surfaces are the usual friendly options. Be cautious or avoid textured tile, natural stone with a rough finish, wallpaper, flaking paint, and bare plaster, because adhesive either cannot grip them evenly or can pull the finish away on removal. Grout lines should never sit under a pad if you can position around them. When in doubt, test one hook in a hidden spot first, load it lightly for a few days, and let your own bathroom give you the answer.
- How do I stop bathroom storage from going rusty?
- Choose materials with humidity in mind from the start. Stainless steel, coated metal, plastic, and resin tolerate bathroom air far better than bare or chipped metal, and a coating that is already scratched will rust where it is scratched. Wipe storage dry now and then rather than letting it sit in puddles, run the fan or open a window after showers, and keep metal organisers out of the direct spray zone where you can. If a small rust spot appears, clean it early, dry the item fully, and move it somewhere drier before it spreads.
- My bathroom has no window. Can I still use these ideas?
- Yes, but ventilation becomes your most important habit. A bathroom with no window holds steam for a long time, and steam is what tests adhesive, feeds mildew, and dulls metal finishes. Run the extractor fan during every shower and for a good while afterwards, leave the door open when the room is not in use, and favour freestanding, tension, and over-door storage over adhesive in the dampest corners. You may also find a small gap between showers where adhesive simply lasts longer, so place sticky upgrades on the wall farthest from the shower head.
- What if my over the toilet shelf wobbles?
- First check that every fixing on the frame itself is fully tightened, because a loose joint makes the whole unit feel unstable. Then check the floor, since bathroom floors are rarely level, and shim the short leg with a small folded piece of card or a furniture pad until the rocking stops. Move heavy items to the lowest shelf and light items to the top. If it still wobbles after all three steps, the honest answer is that the unit does not suit your floor, and a rolling cart or a tank tray will serve you better.
- Can I use adhesive shelves on rental tiles without worry?
- Tiles are generally the safest adhesive surface in a rental bathroom, because pads bond to the hard glaze rather than to paint that can peel. The care points are positioning over flat tile rather than grout lines, cleaning the tile properly before applying, and removing pads slowly at the end of your tenancy. Avoid sticking adhesive over cracked or loose tiles, since removal pressure is the last thing a damaged tile needs. If a tile is already damaged when you move in, photograph it for your records, whatever storage you choose.
- How do I organise a bathroom with no cabinet at all?
- Work by zones, using the upgrades on this page as your furniture. Shower items go on a caddy or adhesive corner shelves. Daily items live on a small shelf beside the mirror or in a slim rolling cart. Backups and spares go over the toilet or in an over-door pocket organizer, and cleaning supplies hide in a basket under a pedestal sink, where a simple fabric skirt can hide them from view. The system works because every category has one address. When something new arrives, it goes to its address or something else leaves.
- What should I measure before buying bathroom storage?
- Measure every space the storage will occupy and every space it must pass or clear. For over-toilet units, the cistern width and height and the room an open lid needs. For carts, the gap at its narrowest point including skirting boards. For tension caddies, the exact floor-to-ceiling or tub-to-ceiling height. For under-sink organizers, the cabinet opening and the position and drop of the pipes. For door storage, whether the door closes freely with hooks in place. Write the numbers in your phone and shop with them open in front of you.
- Are over the door organizers safe for my door?
- They are safe for most doors when they are loaded sensibly and the door closes freely with the hooks in place. The risks are a door frame fitted too tightly, which makes the door stick or scrape, and overloading, which makes the organizer swing and mark the door face. Felt pads on the contact points, heavier items in the lowest pockets, and a door that is closed rather than slammed will prevent almost every problem. If your door sticks even with thin hooks, move the organizer to adhesive hooks on the door face instead.
- How do I keep a shared bathroom tidy with these upgrades?
- Give each person a territory rather than asking everyone to share every shelf. A tier each on the rolling cart, a shelf each over the toilet, or a row of pockets each on the door organizer all work, because people maintain their own space far more willingly than shared space. Label baskets if your household finds labels helpful rather than fussy. Then agree one small shared habit, such as a ten minute reset once a month to clear empties, and the bathroom will mostly look after itself between resets.
- What bathroom storage should I avoid as a renter?
- Avoid anything that needs screws into tile, because drilled tile is the hardest damage to hide and the easiest for a landlord to spot. Avoid suction-only shelves loaded with heavy bottles, since suction lets go without warning in a steamy room. Avoid bare metal that is not made for wet rooms, oversized furniture that blocks the door swing, and any adhesive product with no removal instructions on the pack. If a product cannot tell you how it comes off, it is not a renter product, whatever the listing headline claims.
- How do I remove adhesive hooks without losing my deposit?
- Start early in the day and work slowly. Follow the maker's method exactly, which usually means pulling a tab slowly in the direction shown, keeping the pull close to the wall, rather than levering the hook outward. Keep one hand supporting the item so it does not fall and chip the sink or tub. Roll any soft residue away with a clean thumb, and wipe the spot. If a hook resists, stop and reread the instructions instead of pulling harder. Force is what turns a removable product into a repair job.
- Can I take all of this storage with me when I move?
- Almost all of it, and that is a large part of its value. Freestanding units, carts, caddies, trays, dividers, and door organizers all pack and travel. Adhesive shelves and hooks are the exception, because their pads are usually single-use, so you would take the shelves and buy fresh pads at the next home. Measure your new bathroom before assuming everything fits the same way, because the gap beside one toilet is generous and beside the next is imaginary, and let the new room tell you where each piece belongs.
- Where should heavy items go in a small rental bathroom?
- Low, and on storage that stands on the floor or hangs from a door rather than storage that sticks to a wall. The bottom shelf of an over-toilet unit, the bottom tier of a rolling cart, and the lowest pockets of a door organizer are the safe addresses for heavy bottles and bulk spares. Keeping weight low also makes every frame steadier and every fall, if one ever happens, shorter and less damaging. Glass deserves extra caution at any height in a room full of hard surfaces and bare feet, so decant daily products into plastic where you can.
- How do I deal with humidity damaging my stored products?
- Keep lids closed, keep paper packaging out of the shower zone, and store medicines and anything that must stay perfectly dry in a cabinet or a lidded basket away from the steamiest corner, following any storage guidance on their own labels. Ventilate after showers, wipe bottles dry when you clean, and do not seal damp items inside closed boxes where they will stay damp. A bathroom is a wet room pretending to be a dry one, and your storage choices go better when you respect that truth instead of fighting it.
- Is a tension shower caddy better than adhesive shower shelves?
- They suit different showers. A tension caddy holds more, moves easily, and asks nothing of your tiles, which makes it the safer first choice in a rental and the better choice for a household with many bottles. Adhesive shelves look neater, sit exactly at your height, and free the corner, but they depend on suitable tile and patient curing. Many renters end up with both over time, a caddy in the shower and adhesive shelves in the dry zone by the mirror, each doing the job it is genuinely best at.
Ready for the next room? Return to the Bathroom hub for more no-drill ideas, or start on the kitchen with our magnetic spice rack guide, which needs even less removal, because there is nothing to remove at all.